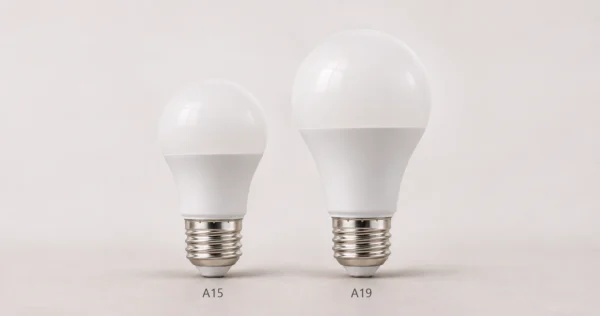
An A15 and an A19 can screw into the same socket and still fit differently under the shade. Choose the bulb and socket before you finalize the shade drawing. An A19 generally needs more room across the shade. Two A19 models can also differ in length. Check whether the bulb fits under the shade and whether there’s room to grip it and unscrew it.
Start with a side view. Draw the socket and the inside of the shade. Show the bulb screwed all the way in.
When you request a custom lighting quote, send the bulb drawing or give the supplier the exact model number. If customers will buy bulbs separately, decide which shapes and sizes the lamp should accept before you order the first sample.
A15 vs A19 Bulb Dimensions
An A19 is the familiar pear-shaped bulb, with a nominal maximum diameter of 2⅜ inches (about 60 mm). An A15 has the same general shape and a nominal maximum diameter of 1⅞ inches (about 48 mm). Here, “nominal” means the size used in the name. The numbers 19 and 15 give that diameter in eighths of an inch.
A15 and A19 tell you the bulb shape and give you a rough idea of its width. To see if a bulb will fit your lamp, look up the width, length, and screw base for that model. The screw base is the threaded part that goes into the socket.
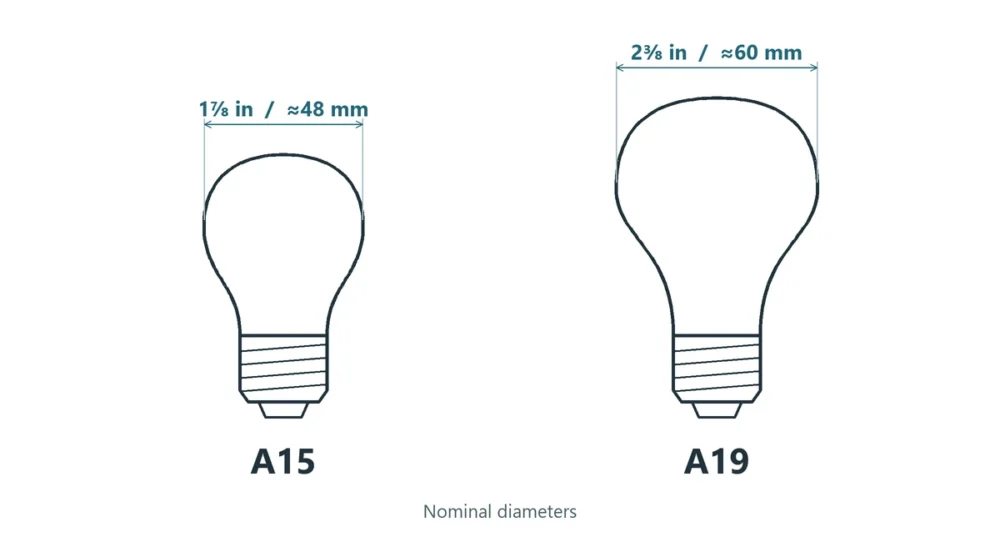
Satco’s A15 LED (S28615) uses an E26 screw base. Satco lists it at about 48 mm across and 86 mm from tip to base. Feit’s A15 appliance bulb (BPA1540W927CAFILHDRP) also uses E26 and is about 89 mm long, roughly 3 mm longer than the Satco bulb.
Even two A19 bulbs with the same screw base can be different lengths. The two A19 bulbs below differ by about 12 mm. The overall length in the table runs from the tip of the bulb to the end of the screw base.
| A19 bulb example | Screw base | Listed diameter | Listed overall length |
|---|---|---|---|
| Feit general-purpose LED (OM40DM/930CA) | E26 | 2.4 in (about 61 mm) | 4.1 in (about 104 mm) |
| iLEDGlow Nightfall red LED | E26 | 2.36 in (60 mm) | 4.57 in (116 mm) |
Our Evening Glow amber A19 is also 60 mm wide and 116 mm long. Both iLEDGlow bulbs are rated at 9 W. When you order either bulb, confirm the screw base (E26 or E27) and voltage (110 V or 230 V) for the version you need.
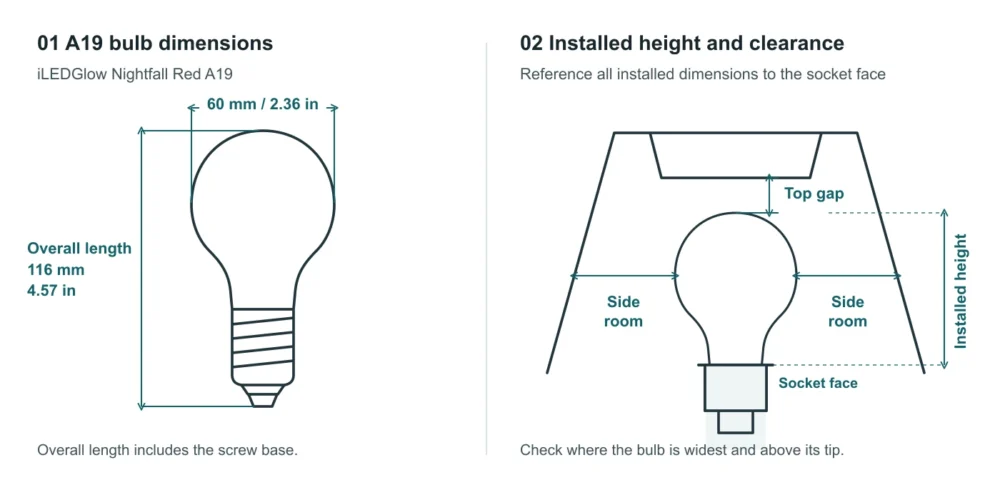
If the shade is shallow or narrow, try an A15 first. To see if an A19 fits, screw the bulb you plan to use into the socket and check the space around its widest part and above its tip.
If the lamp ships with a bulb, have your buyer confirm the supplier’s part number and a backup model. If customers will buy their own A15s, include the longest A15 you expect them to use. Check wider models too, especially if the shade narrows near the bulb.
Is A19 the Same as E26?
A19 tells you the bulb’s shape and nominal diameter. E26 tells you the size of its screw base. Both A15 and A19 bulbs can come with an E26 base. Some A15s use E12, the smaller screw base also called candelabra. Write both codes on the drawing and purchase order, for example, “A15 with an E26 base.”
First decide whether the light source needs to be replaceable. Many cordless table lamps have an integrated LED, which means the light source is built into the lamp. If your lamp takes a screw-in bulb, check the fit of each bulb shape you plan to list.
How to Design a Table Lamp for an A15 or A19 Bulb
Draw a side view through the middle of the socket. Show the bulb screwed all the way in. Start your measurements at the socket face, the rim around the opening. Measure from the rim to the bulb tip to get the installed height. Then measure up to the widest part of the bulb. Check how much room the shade leaves at that height. Check again wherever the shade narrows or a support sticks into that space.
Table Lamp Bulb Fit Checklist
- Check the gap at the sides. Draw the bulb’s outline with the bulb in place. Include the shade liner and any mounting ring. If a bracket sticks out on one side, draw a second view through the bracket to see how close it comes to the bulb.
- Check the gap above the tip. Include any crossbar or diffuser. A diffuser is a panel that softens the light. If your first sample is missing the liner or other hardware, repeat the fit check once those parts are in place.
- Put the bulb in and take it out. Assemble the lamp as the customer will receive it. Check whether you can reach, grip, and turn the bulb. If you have to remove the shade first, put that step in the instructions.
If the shade clips onto the bulb, make sure the clip grips the bulb you plan to use. Draw the clip in place before you check the fit.
Our guide to how lampshades attach to table lamps shows how clips, rings, and other supports fit together.
How to Check Clearance Across Multiple Bulbs
The tallest bulb might come closest to the crossbar. A different bulb might come closest to the mounting ring. To check both, line up the bulb drawings at the socket face. Compare how high each tip reaches and how wide each bulb is wherever the shade or a support gets close.
Allow for tolerances. A tolerance tells you how much a part can vary from the size on the drawing. Check the largest bulb sizes allowed by the drawings against the smallest gaps the lamp drawings allow. If you’ve tested one bulb, record exactly which one you tested.
Say the mounting ring has a 54 mm opening. A bulb that’s 55 mm wide where it meets the ring won’t fit there. One that’s 51 mm wide at the same spot fits in the opening if it sits in the center. Still check the gap around the bulb’s widest point, the space above its tip, and whether the bulb can pass through the ring as you put it in.
If the bulb touches the shade, try moving the socket so the widest part of the bulb sits where the shade is wider. If the tip hits the crossbar, give it more room above the socket. After either change, check that customers can still remove the bulb. Sit at the height where they’ll use the lamp and check whether they can see the bulb. If a shallow shade still leaves too little room for an A19, try an A15 in the same drawing.
What Bulb Dimensions Should You Request From a Supplier?
Ask for a side drawing that shows the dimensions, exact part number, and drawing revision. If it lists an installed height, ask which socket the supplier used and where they started measuring. If it only shows the bulb on its own, screw a sample into your prototype. Measure from the socket rim to the tip.
| Ask the supplier for | What to check |
|---|---|
| Maximum diameter, overall length, and how much each can vary | Rule out bulbs that are too wide or too long for the lamp |
| A side view showing where the bulb is widest | See where the bulb might touch the shade or a support |
| Installed height from the socket rim to the tip, and the socket model used | Check the gap above the bulb |
| Exact screw base, input voltage, actual wattage, and limits on dimmer or enclosed use | Check that the base fits, the voltage matches, and the bulb stays within the lamp’s wattage limit. Check dimmer and enclosure ratings if needed |
Keep the bulb drawing with the shade and socket drawings you used to check the fit. If a supplier proposes a new bulb, compare the drawings. If the shape, dimensions, or base have changed, try the bulb in the assembled lamp and record which versions of the bulb and lamp you tested.
Put the socket, allowed bulb shape, and any verified size limits in the lamp specification. If you’ve approved just one bulb, list the model and revision. If a low crossbar or narrow opening limits what fits, show it in a drawing that looks inside the shade. Your buyer can use that drawing to check the next bulb a supplier proposes.
Can an A19 Bulb Replace an A15 in a Table Lamp?
Yes, if the lamp allows A19 and the replacement meets its size and electrical limits. Check the screw base, bulb dimensions, voltage, and wattage. If the lamp has a dimmer or a shade that fully encloses the bulb, check that the bulb is rated for that use. If the lamp specifies A15 only, list A15 and the required screw base.
Give the support team and the product page the same details. For lamps that allow A19, include the verified size limits or a model you’ve tested. If the shade or socket changes in a later production run, repeat the fit check and update the instructions for that version.